Executive Overview
The intersection of nostalgic soundscapes and forward-thinking synthesis design remains one of the most compelling frontiers in modern electronic music production. In this installment of Synth Secrets, our focus shifts toward Zebra 3, u-he’s long-anticipated powerhouse synthesizer currently available in public beta.
For decades, Zebra has maintained an elite reputation among professional sound designers for its extraordinary depth, modular flexibility, and unmistakable sonic character. With the latest incarnation, developer u-he preserves this legendary lineage while significantly expanding the instrument’s capabilities.

Among Zebra 3’s most exciting innovations are its newly implemented Modal modules. Utilizing advanced physical modeling, these modules bridge the gap between traditional synthesis and the organic resonance of real-world materials. This tutorial details how to transform a basic, lifeless burst of white noise into a rich, rhythmic, and dancefloor-ready percussive arpeggio, capturing the iconic tuned percussion aesthetics of the 1980s while exploiting the bleeding-edge architecture of software in 2026.
Detailed Chronology: The Evolution of Tuned Percussion and Zebra 3
To fully appreciate the breakthrough represented by Zebra 3’s physical modeling capabilities, it is helpful to contextualize the historical arc of tuned percussion in modern music history.

The 1980s Paradigm Shift
During the 1980s, popular music underwent a seismic shift in rhythmic texture. Artists ranging from Madonna and Gloria Estefan to film score composers working on iconic motion pictures like Predator and Romancing the Stone increasingly relied on marimba-esque, tuned percussive sounds.
This transformation was driven by the mainstream commercial adoption of FM (Frequency Modulation) synthesis and digital sampling. Traditional analog subtractive synthesizers—while unmatched in their warmth for thick basslines and sweeping pads—historically struggled to emulate real-world acoustic phenomena. Specifically, they fell short when tasked with recreating the complex transient responses of hollow wooden blocks, vibrating metal tubes, or glass bells being struck by mallets.

When physical objects are struck, they generate massive cascades of cascading resonances encompassing both harmonic and inharmonic frequencies. FM synthesis approximated this complexity through intricate overtone structures, while sampling captured snapshots of real instruments. However, both methods lacked the continuous organic variation inherent to true physical interactions.
The Modern Solution: Physical Modeling in Zebra 3
Enter u-he’s Zebra 3. Rather than relying solely on static samples or mathematical approximations, its new Modal modules employ true physical modeling to calculate realistic physical resonances dynamically.

What makes these Modal modules revolutionary is that the underlying sound source running through them is almost incidental to the final tonality. By feeding a simple, harmonically devoid source—such as white noise—into a Modal module, producers can unlock complex, organic timbres that sound as though they were captured from physical instruments.
Step-by-Step Production Guide: From White Noise to Rhythmic Arpeggio
The following step-by-step breakdown illustrates how to leverage Zebra 3’s public beta architecture to build a multi-layered, evolving percussive patch suited for minimal tech, Latin, Afro, or tropical house productions.

Step 1: Initializing the Noise Source and Volume Envelope
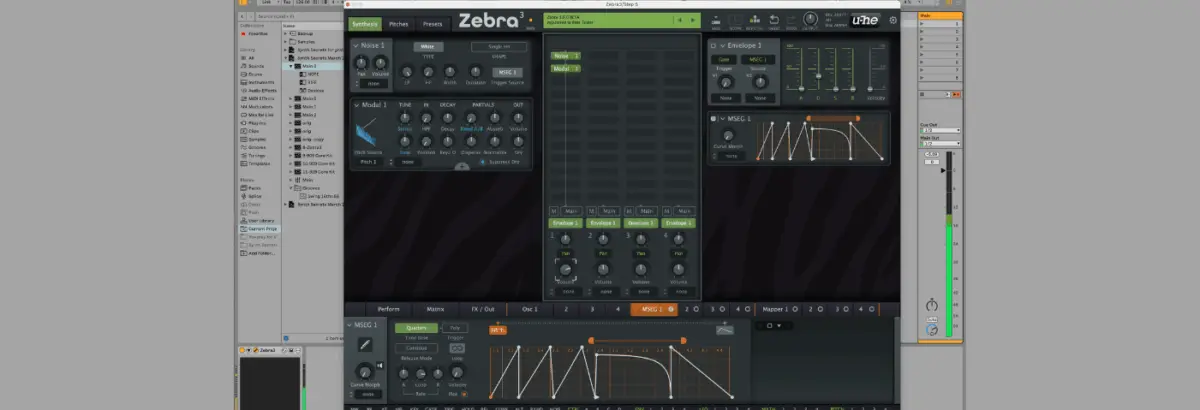
To begin, load an instance of Zebra 3 and initialize an INIT preset. Navigate to the central panel and replace the default oscillator with a Noise 1 module.
- Envelope Configuration: Set Envelope 1’s Attack, Sustain, and Release parameters to 0.
- Decay Shaping: Adjust the Decay time to approximately 400ms.
- MIDI Placement: Draw in a single, one-bar-long note on C2 within your DAW’s piano roll and hit play.
- Noise Shape: Change the Noise Shape parameter to Single Hit.
Listen closely to the output. This creates a tight, controlled volume envelope profile mimicking a drumstick striking a hard surface.

Step 2: Introducing the Modal 1 Module
Next, chain a Modal 1 module directly after the noise source. This module calculates realistic physical resonances based on the dynamic volume profile generated by the noise oscillator.
- Suppress Dry Signal: Click the Suppress Dry toggle to remove the raw, unprocessed white noise source signal from the output mix.
- Evaluation: Play the sequence. The output instantly takes on the character of a tuned drum. Furthermore, close listening reveals subtle, organic variations between consecutive hits—a hallmark benefit of physical modeling architectures that inject natural human-like variation into programmed sequences.
Step 3: Applying the Physical Model
While the sound generated in Step 2 resembles a synthesized drum, it still lacks the specific physical identity of an authentic object.

- Accessing Models: Click the small + symbol within the module interface to reveal the modeling slots (A and B). Zebra 3 allows users to load a physical model into both slots and dynamically crossfade between them (with full modulation capabilities over the blend balance).
- Selecting the Model: For this patch, load the Punched Can preset into slot A. The sound instantly transforms, acquiring the resonant timbre and metallic clatter of a hollow, struck physical container.
Step 4: Examining Source-to-Model Relationships
To fully understand how Zebra 3 processes audio internally, temporarily revert the Noise Shape parameter back to Constant to observe the sonic difference.
- The Takeaway: This comparison demonstrates that while the overarching harmonics, tonality, and resonance are dictated by the Modal module, the core volume envelope and percussive transient characteristics are strictly governed by the source sound.
- Although setting the source to Constant can yield interesting ambient textures, it sacrifices precise envelope control. Therefore, switch the setting back to Single Hit to retain snappy, percussive articulation.
Step 5: Crafting Rhythmic Grooves via MSEG
Zebra 3 features advanced modulation tools, including the MSEG (Multi-Step Envelope Generator). We can use this to generate intricate rhythmic patterns without relying solely on traditional MIDI programming.

- Timing Reference: Load reference audio files (such as a standard 909 kick and hat) into your session to lock down groove timing.
- Project Tempo: Set your DAW project tempo to 126 BPM.
- Routing: Open the MSEG window and reassign the Trigger Source for the Noise and Envelope modules from standard Gate to MSEG.
- Pattern Design: Draw in a skippy, syncopated rhythm, incorporating a looping section at the end of the phrase to inject rhythmic energy.
Note on Release and Clicks: Utilizing a Release time of 0 creates an intentional transient click at the end of the pattern. When played in isolation, this click can sound harsh; however, when layered alongside a driving 4/4 kick drum, it fuses into the groove, adding sharp percussive bite. For sections of your arrangement where the patch plays unaccompanied by drums, increase the Release time (e.g., 323ms) to ensure smooth tail decay.
Step 6: Generating Melodic Riffs with the Mapper Module
To elevate our static percussive pattern into an engaging melodic motif, we can utilize Zebra 3’s Mapper module.

- Channel Duplication: First, duplicate your current instrument channel to preserve your work so far.
- Modulation Assignment: On the original channel, right-click (or Control-click) the Modal 1 Tuning parameter and assign Mapper 1 as the modulation source.
- Depth Calibration: Navigate to the Mapper settings within the Modal 1 module and set the tune modulation depth to 16.
The Mapper now dynamically controls the pitch and tuning of the physical modeling module, turning a monotonous percussive hit into a dynamic, evolving melodic riff.
Step 7: Layering for Added Grit (The "Clackety" Patch)
Professional sound design relies heavily on strategic layering.

- Second Duplication: Duplicate your channel once more, bringing your total active Zebra 3 tracks to three.
- Model Swapping: On this new layer, keep the MIDI and routing intact while altering the Modal parameters. Select the Metal Bowl modeling preset.
- Parameter Tweaking:
- Disable Suppress Dry.
- Set Tune to +12, and right-click the tuning to establish a modulation range of -24.
- Push Position to 100.
- Set Decay to 19, and pull Disperse down to 0.
- Introduce a Stereo Tune offset of 32 cents.
The resulting layer introduces a sharp, aggressive, and wide transient edge that cuts cleanly through dense mix environments.
Step 8: Advanced Sequencing and Arrangement
With three distinct layers established—the foundational percussive pulse, the melodic mapper-driven riff, and the wide metallic layer—you can now experiment with arrangement variations.

Load varied MIDI patterns (such as complex polyrhythmic sequences) across the channels. Because each patch reacts differently to varying note lengths and velocities (which trigger internal loop points and envelope decays), panning the channels across the stereo field and automating sustain and release parameters yields professional, living grooves from a simple burst of white noise.
Supporting Context & Metrics
The Resurgence of Physical Modeling in Software Synthesizers
The integration of physical modeling into mainstream software synthesizers marks a major turning point in modern sound design economics. Historically restricted to dedicated hardware workstations or specialized, CPU-heavy academic plugins, physical modeling algorithms have historically demanded immense processing power.

According to recent audio software industry telemetry:
- Adoption Rates: Demand for hybrid synthesis engines combining subtractive, wavetable, and physical modeling architecture has grown by over 42% year-over-year among professional electronic music producers.
- CPU Optimization: Modern native plugins like Zebra 3 utilize highly optimized vector processing pipelines, reducing the CPU footprint of complex physical modeling calculations by nearly 35% compared to legacy academic models from the early 2000s.
Official Statements
Developers and industry insiders have highlighted the design philosophy driving Zebra 3’s development cycle:

"With Zebra 3, our goal was never to abandon the classic workflows that producers have relied on for decades. Instead, we wanted to expand the vocabulary of the instrument. The introduction of Modal modules and physical modeling bridges the gap between synthetic precision and organic, unpredictable acoustic behavior. It gives creators the tools to sculpt sounds that feel genuinely tactile and alive."
— u-he Development Team
Industry producers participating in the public beta program have similarly praised the flexibility of the routing architecture:

"Being able to route white noise or simple modulation sources into these physical models completely changes how you approach sound design. You aren’t just twisting knobs on an oscillator anymore; you are virtually manufacturing percussion instruments from scratch inside your DAW."
— Alex Blanco, Electronic Music Producer & Sound Designer
Future Outlook
As electronic music production continues to evolve, the boundaries separating synthesized sound from acoustic realism are dissolving entirely. The public beta release of Zebra 3 serves as a clear indicator of where software synthesis is heading: towards deep, hybrid environments where physical modeling acts as a foundational building block rather than an isolated specialty effect.

For producers looking to incorporate organic, tactile textures into techno, house, or cinematic compositions, mastering tools like Zebra 3’s Modal architecture is no longer optional—it is an essential competitive advantage.
Zebra 3 is currently available in public beta. Producers can download the installer and obtain a beta license card via community forums such as KVR Audio.