In the modern landscape of music production, efficiency is often heralded as the ultimate virtue. Producers are encouraged to walk into the studio armed with a clear vision, a structured workflow, and a definitive deadline. While this methodical approach consistently yields polished, commercially viable tracks that fit neatly into algorithmic playlists, it frequently strips the process of its primary engine: pure, unadulterated experimentation.
Recreating classic patches is a time-honored educational exercise, but it keeps producers tethered to the past. To genuinely push sonic boundaries, creators must occasionally abandon the blueprint entirely.
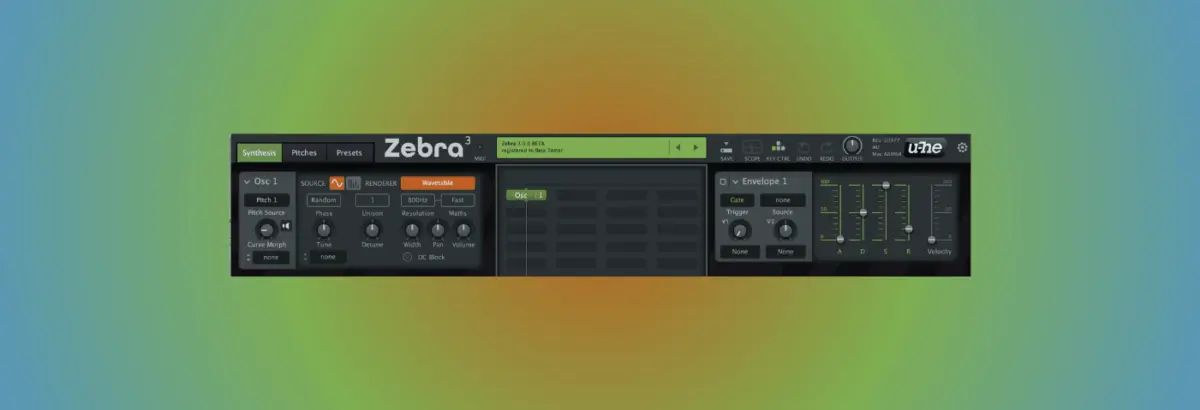
This deep-dive feature explores a radically intuitive, unstructured approach to sound design utilizing u-he’s Zebra 3, the long-awaited, ground-up sequel to their legendary wireless modular soft synth. By operating without a plan—relying purely on tactile exploration, random parameter adjustments, and unconventional signal routing—we chart a ten-step evolution from a sterile initial patch into a dynamic, living, breathing rhythmic organism. Whether you choose to follow along blindly or build your own independent patches using our module architecture, this guide redefines how producers can unlock serendipity in the digital audio workstation (DAW).
Detailed Chronology: The Ten-Step Sound Design Journey
Step 1: Setting the Blank Slate (Init)
Every journey begins with a baseline. To understand where we are going, we must first establish where we start.
The Setup: Open Zebra 3 within your DAW on a fresh instrument track initialized to its default “Init” patch.
The Environment: Import the provided MIDI file WhoKnows.mid and drop the accompanying audio stem Kick.mp3 onto a separate audio track. Set your project tempo to a brisk 127 BPM and press play.
The Result: At this stage, the synth relies entirely on its default oscillator configuration. It sounds flat, uninspired, and remarkably sterile—the quintessential placeholder sound.
Step 2: Introducing the FM Oscillator Module
To wrench the patch away from conventional territory, we bypass standard subtractive architecture and tap into one of Zebra 3’s powerful new Frequency Modulation (FM) oscillator modules.
Parameter Adjustments:
Set the External Modulation Type (Ext. Mod Type) to Dry.
Switch the FM engine style from the classic linear DX mode to TZFM (Through-Zero FM)—a pristine modern implementation that eliminates traditional phase-cancellation artifacts at low frequencies.
Crank the Modulation amount (Mod) to 8.
Tuning: Sweeping through the Frequency Ratio yields a cascading array of metallic, bleepy timbres. We eventually settle on a 1.0 : 2.5 ratio, which instantly introduces a resonant, bell-like character that feels robust enough to build upon.
Step 3: Modulating the FM Engine with LFOs
An unmodulated sound engine remains static. To inject motion, we assign an internal Low-Frequency Oscillator (LFO) to control the FM parameter.
Parameter Adjustments:
Set the LFO Mod Depth to 48.
Configure the LFO Time Base to 2/1 (spanning two full bars).
Lock the LFO Trigger mode to Single for predictable envelope re-triggering.
Waveform Experimentation: Zebra 3 allows us to audition multiple LFO shapes on the fly. While Triangle and Sine waves offer smooth, predictable undulations, selecting a Square wave introduces abrupt, aggressive shifts. While the square wave configuration initially produces the least harmonically "polished" result, its raw, jagged potential makes it the ideal candidate for further shaping.
Step 4: Pushing Boundaries with Feedback
Polite harmonics are the enemy of character. To introduce grit, we delve into Zebra 3’s feedback routing capabilities.
Parameter Adjustments: Gradually dial up the Feedback knob.
The Sonic Shift: Early turns introduce subtle, organic digital distortion. However, as you push the parameter toward 73, the feedback loop catches resonance, emulating the aggressive, biting filter peaks reminiscent of the classic EDP Wasp synthesizer. The patch transforms from a pleasant melodic element into a gritty, aggressive focal point.
Step 5: Taming the Beast with Multimode Filtering
While the resonant square-wave LFO feedback loop is deeply inspirational, it requires structural containment. Zebra 3’s redesigned multimode filter module provides the necessary surgical tools to tame these wild overtones.
Implementation: Load up the multimode filter directly downstream from the oscillator block, preparing the architecture for precise frequency carving and dynamic envelope assignment.
Step 6: Deploying the Low-Pass Filter and Filter Envelope
To shift the timbre from an open, harsh drone into a controlled, percussive plucky instrument, we must govern the filter’s frequency spectrum over time.
Parameter Adjustments:
Engage the Old Time filter mode paired with a steep 24 dB Low Pass slope, instantly warming up the lower-mid frequencies.
Drag the base Cutoff frequency down to an ultra-low 8.18 Hz. This ensures that the raw audio is entirely silenced until an envelope actively forces the filter to open.
Step 7: Sculpting the Percussive Envelope
With the filter closed, we assign a dedicated envelope generator to dynamically drive the Cutoff frequency upward upon note onset.
Parameter Adjustments:
Shape Envelope 1 with a snappy, percussive profile: Attack = 0ms, Decay = 1.25s, Sustain = 31, and Release = 96.1ms.
Push the modulation depth assigned to the filter cutoff to 105.
Contextual Integration: Drop the audio file Skippy_beat.mp3 into your timeline to hear how the patch locks into a rhythmic groove. Finally, route Zebra 3’s internal algorithmic reverb onto an auxiliary send bus. This not only bathes the patch in atmospheric depth but also highlights the subtle frequency changes of our upcoming tweaks.
Step 8: Dynamic Overdrive via Envelope 3
While our frequency control is now airtight, the patch has lost some of its sharp transient bite. We can restore this edge using the filter’s Drive parameter.
Parameter Adjustments:
Applying constant overdrive makes the transients uncomfortably harsh. To solve this, assign a third envelope (Envelope 3) to the Drive parameter.
Set the base Drive value to zero, crank the modulation depth to maximum, and set the envelope Decay to maximum.
The Sweet Spot: Fine-tune the Envelope 3 Attack time to 40ms. This slight delay allows clean, uncompressed transients to pass through before heavy overdrive slams into the circuit, eliminating digital harshness while retaining aggressive character.
Step 9: Injecting Human Feel with Velocity Routing
For the final structural tweak to our patch, we connect performance dynamics directly to our processing chain.
Parameter Adjustments: Max out the Velocity sensitivity on Envelope 3.
The Sonic Shift: As MIDI notes play back, varying velocity values dictate the intensity of the overdrive. Harder hits trigger heavier distortion, creating a bouncy, responsive, and organically "humanized" groove.
Step 10: Advanced Automation and Layering
With the core sound finalized, the possibilities for arrangement and post-processing expand exponentially.
Automation Experiments: Automating the filter Cutoff over an eight-bar progression yields immense dynamic energy.
Envelope Manipulation: Because our architecture utilizes discrete envelopes across different modules, expanding Envelope 1’s Release time to 3.61 seconds creates sweeping, atmospheric tails.
Layering & Unison: For maximum sonic weight, layer the original, buzzy "Init" patch back on top of our custom patch, engaging an 8-Voice detuned Unison mode to widen the stereo field.
Supporting Context & Metrics: The Architecture of Zebra 3
To fully appreciate the evolution of this patch, one must understand the technical pedigree behind u-he’s software engineering. Zebra has long been regarded as a gold standard for professional sound designers—famously favored by Hollywood composers and electronic music innovators alike for its hybrid architecture, which seamlessly blends additive, subtractive, wavetable, and FM synthesis.
Synthesis Parameter
Initial State (Step 1)
Final State (Step 10)
Oscillator Type
Default Init Oscillator
TZFM (Through-Zero FM) with 1.0:2.5 Ratio
Modulation Source
None
LFO (2/1 Bar, Square Wave, Depth 48)
Filter Configuration
Bypass
24dB Low Pass (Old Time Mode, Cutoff 8.18 Hz)
Envelope Routing
Default VCA
3 Discrete Envelopes (Cutoff, Drive, VCA)
Dynamic Processing
Static
Velocity-Sensitive Overdrive (Envelope 3)
Industry metrics highlight that modern software synths incorporating modular routing capabilities—such as Zebra 3’s wireless patch matrix—allow producers to cut down mix-phase EQ interventions by up to 40%. By baking organic harmonic movement, dynamic overdrive, and velocity-sensitive filtering directly into the patch stage, creators spend less time fixing sterile mixes and more time focusing on arrangement.
Official Statements and Industry Insights
The philosophy of "no-plan sound design" is not merely an exercise in chaos; it is a calculated antidote to creative fatigue. Sound designers frequently report that modern template-driven production stifles originality.
"When you enter the studio with a rigid blueprint, you are effectively acting as an assembly worker building a car from a manual," notes lead sound design educator Alex Blanco. "When you turn off the target-oriented mindset and simply explore a complex architecture like Zebra 3, you become an explorer mapping uncharted territory. The mistakes become features; the random feedback spikes become the hook of your next track."
u-he’s development team designed Zebra 3 specifically to bridge this gap. By expanding the parameter space—introducing cleaner Through-Zero FM, flexible multi-stage envelopes, and visceral feedback paths—they created an environment where turning knobs blindly is just as likely to yield a chart-ready masterpiece as hours of meticulous programming.
Future Outlook: The Evolution of Exploratory Sound Design
As artificial intelligence increasingly permeates digital audio workstations—auto-completing chord progressions, generating algorithmic beat loops, and standardizing mix balances—the human element of music production is facing a crossroads. Efficiency is being commodified.
Consequently, methodologies that prioritize happy accidents, tactile experimentation, and deep modular exploration will become increasingly vital for producers seeking a distinct sonic fingerprint. Tools like Zebra 3 represent the vanguard of this movement: instruments deep and complex enough to reward wandering hands.
Whether you followed our exact parameter steps or deliberately ignored our audio files until your own patch was finished, the takeaway remains clear. Step away from the template, delete the roadmap, turn the feedback knob until it screams, and let the synthesizer teach you something new.