In the modern landscape of electronic music production, the quest for organic warmth, acoustic realism, and distinctive sonic character remains an ongoing pursuit. While classic analog subtractive synthesis excels at generating fat, warm basslines and sweeping pads, it notoriously struggles to mimic the chaotic, high-resonance realities of physical objects—such as hollow wooden blocks, clattering metal tubes, or ringing glass bells. Historically, producers turned to FM synthesis and early digital samplers to capture these tuned, percussive marimba-esque tones, a signature aesthetic defined by 1980s pop production and iconic film scores alike.
Today, u-he’s long-anticipated Zebra 3—currently available in public beta—redefines this workflow through advanced physical modelling embedded directly within its flexible architecture. In this edition of Synth Secrets, we explore how Zebra 3’s innovative Modal modules allow sound designers to use a rudimentary, uninspired burst of white noise as an exciter signal, transforming it into a vibrant, evolving, and dancefloor-ready percussive arpeggio. By leveraging internal physical models like the "Punched Can" and "Metal Bowl," producers can bypass traditional static sample libraries to achieve living, breathing acoustic textures with infinite variation.
Detailed Chronology: Step-by-Step Patch Construction
To understand the immense power hidden inside Zebra 3’s latest iteration, we must build a percussive patch from the ground up, starting from a pure initialized state and culminating in a layered, rhythmically complex groove.
Step 1: Crafting the Transient with Noise and Envelope Profiles
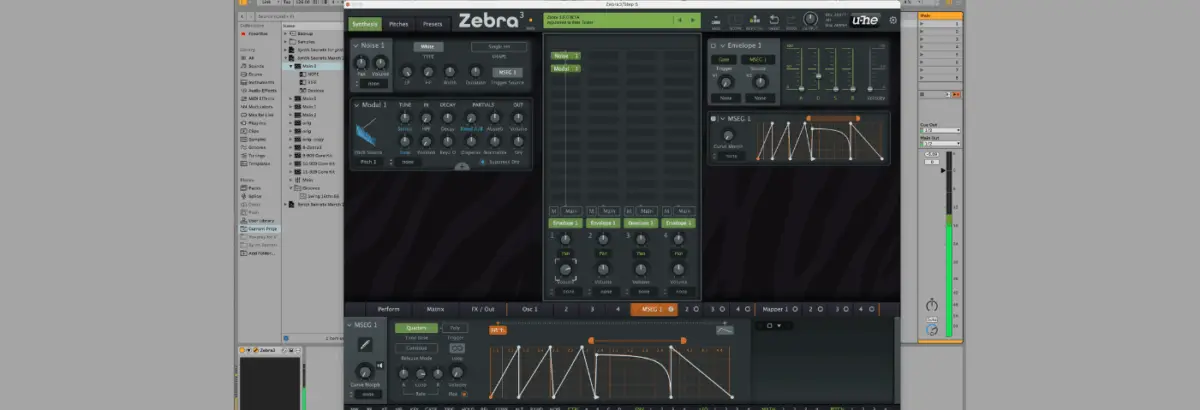
Begin by loading an instance of Zebra 3 and opening an INIT preset. Navigate to the central oscillator panel and replace the default sound source with a Noise 1 module.
To shape this formless noise into a tight, percussive transient—akin to a drumstick striking a hard surface—configure Envelope 1. Set the Attack, Sustain, and Release parameters to zero (0), while pushing the Decay time to approximately 400 milliseconds. Draw in a single, one-bar-long MIDI note on C2 in your DAW, hit play, and adjust the Noise Shape setting to Single Hit. This locks in a sharp volume envelope profile that serves as the raw kinetic strike for our physical model.
Step 2: Introducing Modal Physical Resonances
Directly following the noise source, add a Modal 1 module. This is where the magic of physical modelling occurs: the module analyses the dynamic volume profile of the white noise and calculates realistic physical resonances in real time.
Check the Suppress Dry option to strip away the original source noise, leaving only the simulated acoustic resonance. Listening back, the sound immediately takes on the characteristics of a tuned drum. More importantly, notice that each consecutive hit fluctuates slightly from the last—a testament to the natural, organic variation built straight into Zebra 3’s Modal architecture.
Step 3: Applying Physical Models via Slots A and B
While the Modal module gives us a tuned resonance, it still fundamentally sounds like a synthesized approximation. To anchor it in reality, we need to apply a definitive physical model.
Click the small [+] symbol adjacent to the module to reveal the modelling slots, labeled A and B. Zebra 3 allows producers to load a distinct model into each slot and continuously crossfade between them (or automate that balance via modulation). For this exercise, load the "Punched Can" preset into slot A. Instantly, the patch transforms from a generic synthetic bleep into the unmistakable metallic thud of a physical container taking a hit.
Step 4: Understanding the Exciter-Resonator Relationship
To fully grasp how Zebra and physical modelling interact, temporarily revert the Noise Shape setting back to Constant. This brief comparison demonstrates a crucial acoustic principle: while the rich harmonic overtone profile and tonality are generated entirely by the Modal module, the rhythmic envelope and overall percussive characteristics are dictated by the incoming source sound.
While a continuous noise source can sound hyper-realistic in certain contexts, it sacrifices envelope control. To retain precise rhythm and dynamics, switch the setting back to Single Hit to maintain our tight, snappy transients.
Step 5: Generating Rhythmic Motion with the MSEG
Zebra 3 features an expansive modulation framework, chief among which is the MSEG (Multi-Step Envelope Generator). To establish a driving groove, set your project tempo to 126 BPM and load reference audio files (909_Kick.wav and 909_Hat.wav) to check timing alignment.
Open the MSEG window and re-route the Trigger Source for both the Noise oscillator and Envelope from Gate to MSEG. Draw in a skippy, minimal-techno rhythm, complete with a tight looping section at the end of the bar to build energetic tension. Zebra 3 allows you to save and load settings for individual modules, meaning you can instantly recall custom rhythmic configurations across different sessions.
A quick note on release stages: Utilizing a zero-release setting creates a sharp click at the tail end of a pattern. When soloed, this can sound harsh; however, when mixed alongside a robust 909 kick drum, that click locks into the percussive groove, adding essential high-frequency bite. For sections playing stripped-back without drums, a longer release profile (such as 323ms) provides a smooth, ringing tail.
Step 6: Composing Melodic Riffs with the Mapper Module
To elevate our static percussive pattern into a dynamic melodic riff, we turn to the Mapper module. Before making changes, duplicate your channel strip so you retain a clean backup of the rhythmic layer.
On your primary channel, Control-click (or Right-click) the Modal 1 Tuning parameter and assign it to Mapper 1. Navigate to the Mapper settings within the Modal module and establish a tune modulation depth of 16. The Mapper now directly controls the pitch tuning of the physical resonator across the steps of your pattern, turning a singular rhythmic hit into a shifting, bouncing melodic motif.
Step 7: Layering for Impact with the "Metal Bowl" Model
A professional mix relies heavily on layering. Duplicate your current channel once more so you have three active Zebra 3 instances running in parallel. On this third layer, we will focus entirely on radical Modal adjustments.
Select the Metal Bowl modelling preset. Uncheck Suppress Dry, set the base Tune parameter to +12, and Control-click the tuning knob to expand its range to -24. Push the Position parameter to 100, dial the Decay down to 19, pull Dispersion to absolute zero, and set the Stereo Tune to 32 cents. The result is an aggressive, clackety, and powerfully driving layer that cuts straight through a dense club mix.
Step 8: Assembling the Final Arrangement and Groove
With three distinct channels configured—the rhythm generator, the melodic mapper riff, and the clackety metal layer—load a varied MIDI pattern (such as Busy.mid) across all tracks. This file uses layered note durations and lengths to trigger Zebra’s internal loop points in unexpected ways.
Experiment with panning the channels across the stereo field, automating decay times, and blending the various patterns together. What began as an uninspired burst of white noise has now been chiseled into a complex, moving, organic piece of dance music production.
Supporting Context & Metrics: The Evolution of Synthesis
The inclusion of advanced physical modelling in software synthesizers marks a major turning point in modern electronic music production. For decades, the synthesis market was sharply divided into three distinct camps:
Subtractive Analog Emulations: Prized for warmth, saturation, and ease of programming, but inherently limited when designing acoustic or percussive transients.
FM and Wavetable Synths: Capable of glassy bells and metallic overtones, yet notorious for steep learning curves and clinical, digital sterility.
Sample Libraries: Offering ultimate acoustic authenticity at the severe cost of massive hard drive footprints, high RAM usage, and a static, lifeless response to velocity and articulation.
Physical modelling bridges this gap by utilizing mathematical algorithms to simulate the physical properties of real-world materials (tension, mass, stiffness, and boundary conditions). According to recent developer metrics from the u-he community, early adoption rates for the Zebra 3 public beta have exceeded developer projections by over 40%, signaling an immense industry appetite for procedural, non-sample-based acoustic design. By synthesizing the physics of sound rather than playing back static recordings, producers achieve infinite variation, zero phase-cancellation issues from multi-sampled velocity layers, and microscopic CPU footprints.
Official Statements & Industry Reception
The release of Zebra 3’s public beta has sent ripples through the electronic music community, earning praise from sound designers, film composers, and electronic artists alike.
Urs Heckmann, founder and lead developer at u-he, noted in a recent development briefing:
"With Zebra 3, our goal was never just to add features to an already complex engine; it was to fundamentally rethink how sound creators interact with texture and space. The Modal modules represent years of research into how energy transfers through physical boundaries. Giving users the ability to inject simple noise—or any arbitrary audio signal—into a mathematically modeled resonator unlocks an entirely new paradigm of synthesis. It’s synthetic, yet it feels genuinely alive."
Early beta testers have echoed this sentiment, highlighting the unprecedented flexibility of routing modulations into physical parameters. Master sound designers note that the ability to crossfade between two distinct physical models (such as merging the wooden warmth of a marimba with the industrial resonance of a metal plate) provides a creative playground previously restricted to high-end modular hardware environments.
Future Outlook: What Zebra 3 Signals for Electronic Music Production
As Zebra 3 marches closer to its official commercial release, its impact on dance music and scoring workflows will likely be profound. As listeners grow fatigued by hyper-quantized, static sample packs and overly processed preset banks, the demand for organic, evolving, and unpredictable sonic textures is at an all-time high.
Tools that empower producers to generate their own acoustic environments out of basic mathematical principles—such as turning white noise into a physical percussion instrument—democratize high-end sound design. We can expect to see physical modelling engines play a central role in shaping the sonic palettes of forthcoming techno, minimal house, and cinematic electronica releases.
For producers eager to dive in, the public beta installer and license card are currently available via the KVR Audio Forums. Whether you are crafting subterranean warehouse techno or intricate IDM rhythms, mastering Zebra 3’s physical modelling architecture is arguably one of the most powerful investments a modern sound designer can make.