Immersed entirely in an era defined by neon aesthetics, gated reverbs, and pioneering electronic pop, sound designers continue to draw boundless inspiration from the 1980s. While our editorial team has explored vintage hardware and retro workflows extensively over the past month, discovering a modern synthesizer that successfully bridges time-tested nostalgia with forward-thinking sonic design remains a rare thrill.
In this edition of Synth Secrets, we dive headfirst into Zebra 3, the long-awaited next-generation powerhouse from u-he. Famed for its modular depth, pristine filter architecture, and unmistakable character, Zebra has long held legendary status among professional sound designers. This latest incarnation honors that rich legacy while expanding its sonic horizons, offering an inspiring environment where physical modelling meets modern electronic music production.
In this tutorial, we will explore one of Zebra 3’s most exciting features: its newly minted Modal modules. By routing simple, unassuming white noise through advanced physical modelling algorithms, we will construct a vibrant, organic, dancefloor-ready percussive arpeggio from scratch. Whether your stylistic home is minimal tech, latin-infused house, or driving afro-percussion, this guide will unlock new dimensions in your sound design workflow.
Detailed Chronology: The Evolution of Tuned Percussion
To fully appreciate the breakthrough represented by Zebra 3’s physical modelling architecture, it helps to understand how tuned percussive sounds entered the mainstream consciousness.
The 1980s: The FM and Sampling Revolution
Look back at the musical landscape of the 1980s—from the pop hooks of Madonna and Gloria Estefan to iconic cinematic scores like Predator and Romancing the Stone—and you will notice an immediate explosion of marimba-esque, glassy, tuned percussive textures.
The catalyst for this sonic shift was straightforward: the widespread commercial adoption of Frequency Modulation (FM) synthesis and early digital sampling. Traditional analog subtractive synthesizers, for all their warmth and fatness, struggle immensely when tasked with mimicking acoustic phenomena in the real world. Specifically, they fail miserably at replicating the complex acoustic signature of hollow objects being struck with sticks.
The Physics of Impact
When a metal tube, a hollowed-out log, or a glass bell is struck, it does not vibrate at a single fundamental frequency. Instead, it unleashes a cascading wave of complex resonances—both harmonic and wildly inharmonic.
Historically, producers relied on two primary methods to emulate this:
FM Synthesis: Using carrier and modulator operators to approximate complex overtone structures.
Sampling: Recording real-world instruments to create playable, static audio clips.
While effective, both methods have limitations. Samples lack dynamic variation unless heavily multisampled, and FM programming can quickly become an exercise in frustration.
Enter the Modal modules in u-he’s Zebra 3. Instead of relying purely on subtractive filtering or sample playback, these modules employ true physical modelling to dynamically recreate the acoustic resonances of struck objects. The results are nothing short of stunning.
Supporting Context & Metrics: Turning Noise into Groove
Perhaps the most fascinating characteristic of Zebra 3’s Modal modules is that the input sound is almost incidental to the final tonality. Whether you feed it a rich sawtooth wave, a complex chord, or raw audio, the physical model imposes its own acoustic laws upon the signal.
To demonstrate this, we will take a basic, unassuming burst of white noise and transform it into a complex, polyrhythmic, and deeply organic percussive groove suited for modern club floors.
Step-by-Step Tutorial: Building the Patch
Step 1: Crafting the Transient Source
Load an instance of Zebra 3 and initialize a blank preset (INIT).
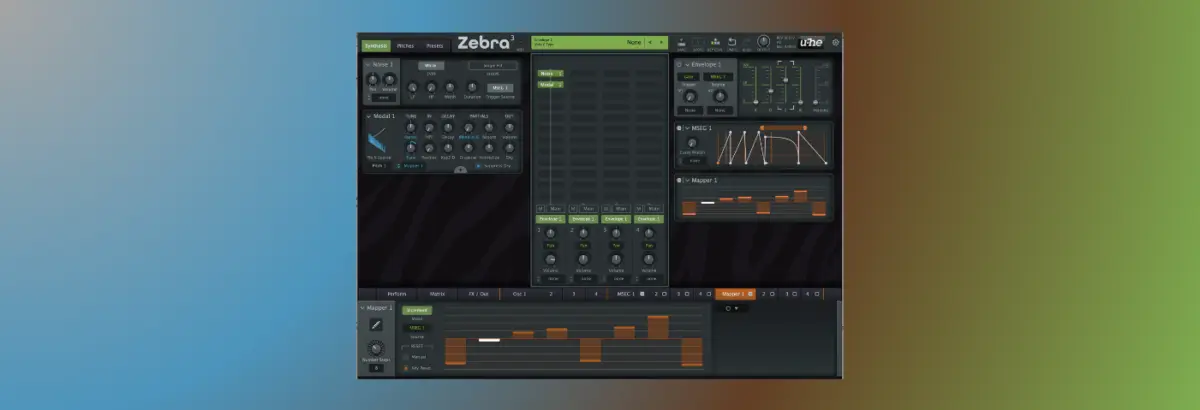
Direct your attention to the center oscillator panel. Replace the default oscillator with a Noise 1 module.
Configure Envelope 1 by setting the Attack, Sustain, and Release to 0, while extending the Decay to approximately 400ms.
Draw in a single, one-bar-long note on C2 in your MIDI piano roll and hit play.
Change the Noise Shape parameter to Single Hit. Listen closely to the tight, punchy volume profile—it instantly mimics the transient snap of a drumstick striking a hard surface.
Step 2: Introducing the Modal Resonator
Insert a Modal 1 module immediately following your noise source.
This module begins calculating realistic physical resonances based on the dynamic volume profile of your white noise source.
Click the Suppress Dry toggle to filter out the raw white noise source signal, leaving only the modeled resonance.
Listen to the output: it immediately takes on the character of a tuned drum. Pay close attention to the subtle micro-variations between hits—this organic inconsistency is the signature hallmark of physical modelling.
Step 3: Applying Physical Models
While the sound is already drum-like, it still bears a slightly synthesized timbre. To infuse real-world acoustic life into the patch, click the small + symbol to reveal the hidden modelling slots: A and B.
You can load distinct physical models into both slots and crossfade between them (or modulate the balance dynamically).
For this exercise, load the Punched Can model into slot A. Instantly, the patch transforms from a generic synth blip into a convincing, physical metallic object.
Step 4: Balancing Envelope and Tone
To understand the symbiotic relationship between the noise oscillator and the Modal module, briefly switch the Noise Shape back to Constant.
This comparison proves that while the harmonics and tonality originate in the Modal module, the percussive envelope and rhythmic transients are entirely driven by the source sound.
While a constant noise source offers a unique texture, it strips away envelope control, so switch the setting back to Single Hit to retain our tight percussive punch.
Step 5: Rhythm Generation via MSEG
Zebra 3 features an extraordinarily powerful Multi-Step Envelope Generator (MSEG). Let’s use it to program a dynamic rhythmic pattern.
Load reference timing audio files (909_Kick.wav and 909_Hat.wav) into your DAW project and set your master tempo to 126 BPM.
Open the MSEG window in Zebra 3. Change the trigger source for the Noise and Envelope from Gate to MSEG to tie our timing directly to the step generator.
Draw in a skippy, rolling rhythmic pattern, concluding with a rapid looping section at the end of the bar for added rhythmic energy.
Note on Release Times: A release time of 0 creates an audible transient click at the end of the pattern. While jarring in isolation, this click locks in brilliantly against a four-to-the-floor kick drum, acting as a natural percussive element. For ambient or breakdown sections where drums drop out, dial in a longer release time (e.g., 323ms) for a smoother tail.
Step 6: Melodic Sequencing with the Mapper Module
Duplicate your current instrument channel so you have two identical versions.
On the original channel, right-click (or Control-click) the Modal 1 Tuning parameter and assign Mapper 1 as the modulation source.
Open the Mapper settings within Modal 1 and set the tuning modulation depth to 16.
Program a melodic sequence inside the Mapper grid (or load a pre-configured module preset) to turn our fixed percussive clicks into a driving, hypnotic bass riff.
Step 7: Layering for Industrial Grit
Duplicate your channel once more, giving you a total of three active layers.
On this third copy, select the Metal Bowl modelling preset.
Disable Suppress Dry, set the Tune parameter to +12, and right-click the tuning to expand its range to -24.
Set the Position to 100, Decay to 19, and drop Disperse to 0. Finally, dial in a Stereo Tune value of 32 cents.
The result is an aggressive, clackety, industrially charged layer that pushes the rhythm forward with immense power.
Step 8: Complex Arrangements and Polyrhythms
Import a more complex MIDI file (such as Busy.mid) across all three channels to test the patch under varied rhythmic conditions.
Experiment with overlapping note lengths, which dynamically trigger the loop points programmed into your MSEG patches.
Pan your three layers across the stereo field, adjust individual sustain and release parameters, and enjoy a rich, evolving percussive groove—all generated from a humble burst of white noise.
Official Statements & Community Response
The release of Zebra 3 into public beta has sent ripples through the electronic music production community. Known for taking their time to refine digital instruments to absolute perfection, u-he has once again captivated sound designers worldwide.
"With Zebra 3, our goal was never to abandon the architecture that producers have relied on for over a decade, but rather to break open new doors in synthesis," noted a representative from the u-he development team during the early beta rollout. "The introduction of physical modelling via our new Modal modules represents a massive leap forward, allowing soft synths to interact with acoustic principles in ways previously restricted to dedicated physical modeling hardware."
Early adopters on prominent production forums like KVR Audio have echoed this sentiment, praising the synthesizer’s CPU efficiency, intuitive routing matrix, and the sheer organic unpredictability of its physical modelling algorithms.
Future Outlook
As Zebra 3 moves steadily through its public beta phase, the implications for modern electronic music production are profound. The ability to seamlessly fuse subtractive synthesis, wavetable manipulation, and advanced physical modelling within a single, highly optimized workstation instrument changes the game for producers scoring films, designing sound effects, or crafting forward-looking club anthems.
For those eager to experiment, the public beta installer and beta license cards are currently available via the official KVR Audio forums. As developers continue to refine the engine ahead of its official commercial release, one thing is certain: Zebra 3 is poised to define the sound of electronic music production for the next decade.
Zebra 3 is currently in public beta. You can download the installer and access your beta license card here.
Don’t have Ableton Live to follow along? You can purchase industry-standard production software here. (Please note: this is an affiliate link; purchases made through this link may earn us a small commission at no extra cost to you).