In the landscape of modern electronic and indie-dance music, few textures hold the hypnotic, emotional gravity of the opening harmonic drone in LCD Soundsystem’s 2007 masterpiece, "Someone Great." Driven by a relentless, rhythmic pulse and a shimmering harmonic profile, the patch serves as the beating heart of the track, bridging the gap between cold analog minimalism and visceral, organic euphoria.
For the latest installment of our flagship Synth Secrets series, we examine the anatomy of this legendary sound. Using u-he’s Diva—a virtual analog synthesizer renowned for its uncanny emulation of hardware filter topologies and oscillator behavior—we deconstruct how a remarkably simple foundation (a single sawtooth wave, strategic intervals, and precise modulation) can yield a production-grade patch.
Beyond merely cloning a classic record, this guide explores the versatility of the resulting patch. By manipulating envelope shapes, applying multi-band EQ notches, and chaining sidechain compression with tape saturation, producers can transform a single harmonic drone into an adaptable, genre-bending weapon suitable for house, techno, ambient, and modern synth-pop arrangements.
Detailed Chronology: Step-by-Step Patch Construction
To achieve the nuanced warmth of the original recording, we must approach sound design with surgical precision. Follow this ten-step walkthrough inside u-he Diva to build, process, and evolve the "Someone Great" patch from scratch.
Step 1: Initializing the Analog Architecture
The golden rule of subtractive synthesis dictates that simpler patches demand pristine sound sources. We want rich, organic analog vibes right out of the gate.
Load an instance of u-he Diva and initialize a blank "Init" patch.
Set up the voice architecture by selecting the Dual VCO module for your oscillators and the Analogue Env for Envelopes 1 and 2.
Lock your project tempo to 112 BPM. While slightly more sedate than the original track’s tempo, this slower pace allows us to evaluate the subtle interactions of our modulations without getting overwhelmed by speed.
Step 2: Programming the Core Dyad
The characteristic melancholic bounce of the intro relies on a specific interval configuration.
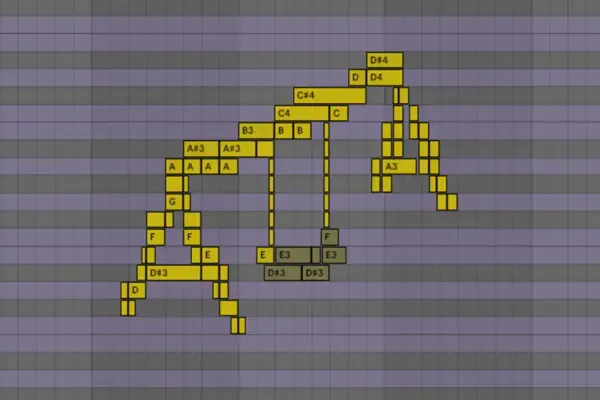
Program a dyad (a two-note chord) alternating between G and D.
Examine the underlying voicings closely: the arrangement utilizes three distinct D notes (D2, D3, and D4) with a G3 sitting squarely between them. Depending on whether you anchor your theory to the lower or upper register, this functions as a fourth or fifth interval relationship.
Set the note lengths just shy of a quarter note to maintain rhythmic separation and space in the mix.
Step 3: Oscillator Calibration and Filtering
With our MIDI notes laid out, it is time to sculpt the raw oscillator output.
Disable Oscillator 1 entirely.
Leave Oscillator 2 on its default sawtooth wave, but tune it up exactly one octave (corresponding to the 4 setting on the octave knob).
Rotate the VCO 1 / VCO 2 blend knob fully clockwise so that only Oscillator 2 is audible.
Push the filter Cutoff up to 108 and dial the resonance (Emphasis) to 15.5. Even at this early stage, the characteristic timbre of the track begins to emerge.
Step 4: Velocity Mapping and VCA Response
To inject human feel and dynamic variance into the patch, we must link performance controls to our amplitude and tone.
Set the velocity of the primary D2 note to maximum (127), and drop the remaining three notes to a velocity of 103.
Navigate to the VCA section, select Velocity as a modulation source from the dropdown menu, and crank the modulation depth to maximum. This ensures that harder hits bite harder, enriching the overall harmonic spectrum.
Step 5: Surgical EQ Filtering
A critical tonal element often overlooked in basic synth tutorials is corrective equalization. To mirror the exact frequency profile of the target hardware:
Insert an EQ module and cut precise notches across four key harmonic bands: 150Hz, 300Hz, 600Hz, and 1.2kHz.
Crucial Observation: Notice the mathematical relationship here—each frequency is precisely double the previous one (one octave higher), and all four hover directly around the fundamental frequencies of our D notes. By dipping out these root D frequencies, we effectively step back the clutter and let the G notes shine through.
Step 6: Injecting Rhythmic Pumping (Envelope 1)
To judge our rhythmic pumping accurately, context is everything.
Load a robust, 909-style acoustic/electronic kick drum onto an adjacent channel and let it loop continuously at 112 BPM.
On Diva’s Envelope 1 (wired to the VCA/Amp), set the Attack to 49 to create an instant ducking/pumping sensation.
Dial the Decay to 75 and set a slightly extended release tail of 29. Finally, push the VCA master volume back up to compensate for attenuation.
Step 7: Sculpting Filter Modulation (Envelope 2)
Amplitude pumping alone is not enough; true analog movement requires filter modulation.
Crank the Env 2 filter modulation depth to fully positive (+).
Switch over to Envelope 2 and, while auditioning the loop against your kick drum, dial in an Attack of 68, a Decay of 49, and a Sustain of 0.
This dual-envelope approach simultaneously emphasizes the rhythmic pump of the track while injecting sharp tonal evolution into every single step.
Step 8: Spatial Processing with Plate Reverb
To lock the synth into a believable acoustic space reminiscent of LCD Soundsystem’s production aesthetic:
Engage Diva’s internal Plate 1 reverb algorithm.
Max out the Size parameter and push the pre-delay up to the halfway mark.
Acoustic Principle: In physical spaces, sound waves take time to travel across distance before striking boundaries and reflecting back to the listener. A generous pre-delay leaves the initial transient completely dry and punchy, maintaining clarity before the lush reverb tail washes over the mix.
Step 9: Sidechain Compression and Tape Saturation
For the final polish on our mix bus:
Implement traditional sidechain compression triggered by the kick drum channel. This sits in seamless harmony with the internal envelope pumping we established in Step 6.
Follow the sidechain with a tape drive saturation plugin placed after the compressor. Because tape saturation responds dynamically to signal strength, the sidechain compression actually causes the saturation unit to generate richer harmonic distortion precisely on the louder peaks of the pump cycle.
Step 10: Repurposing the Patch for Alternative Genres
As promised, this patch is a chameleon. By altering the envelope decay and transient shape, the exact same core drone can be deployed across entirely different sonic palettes. Check out the included project files—Big Belgian Snog Trumpet.h2p and Big Trumpet.h2p—to hear how a simple adjustment to Envelope 2 turns our indie-dance drone into a punchy, brassy club instrument.
Supporting Context & Metrics
The Engineering Philosophy Behind "Someone Great"
Released in 2007 on DFA Records, LCD Soundsystem’s Sound of Silver is widely regarded as a watershed moment for dance-punk and electronic pop. James Murphy, the mastermind behind the project, has frequently championed a hybrid production ethos—marrying the raw, unpolished imperfection of punk rock with the meticulous drum programming and synthesis of classic disco and krautrock.
The opening of "Someone Great" utilizes subtractive synthesis not to sound futuristic, but to evoke a melancholic nostalgia. By relying on a lone sawtooth wave filtered aggressively through resonant low-pass architecture, Murphy achieved a sound that feels both fragile and monolithic.
Software Benchmarks: Why u-he Diva?
Replicating vintage hardware behavior in the box requires an engine capable of modeling zero-delay feedback filters and component-level drift. Industry metrics place u-he Diva at the apex of native virtual analog processing.
Emulated via internal voice stacking & trim controls
Natural thermal component drift
Official Statements & Producer Insights
Speaking on the workflow behind Synth Secrets, lead instructor and sound designer Alex Blanco emphasized the importance of mastering foundational patches over collecting endless preset libraries:
"When producers look at tracks like ‘Someone Great,’ they often assume there is a massive chain of esoteric modular gear behind the sound. In reality, the greatest electronic music achievements are born from master-class simplicity. By understanding how a single sawtooth wave interacts with dynamic filtering and envelope shaping, producers unlock an entire universe of sonic utility. Diva gives us the component-level realism needed to make that simplicity breathe."
Furthermore, u-he’s development team has consistently noted that patches utilizing single oscillators paired with meticulous modulation often sit better in dense mixes than heavily layered supersaws, leaving essential frequency space for vocals, basslines, and percussion.
Future Outlook: The Evolution of Analog Emulation in Modern Production
As music production technology hurtles toward deeper integration with machine learning and advanced physical modeling, tools like u-he Diva continue to set the benchmark for tactile, inspiring digital instruments.
The methodology outlined in this tutorial—breaking down iconic commercial tracks into their core mathematical, spectral, and rhythmic components—represents a vital shift in modern music education. Rather than relying on static preset packs, contemporary producers are increasingly adopting an "archeological" approach to sound design: digging into vintage mixes, isolating individual components, and reverse-engineering their signal paths.
Whether you are producing driving techno, hypnotic minimal house, or emotive indie-dance, mastering the techniques behind the "Someone Great" harmonic drone proves that with the right synthesizer, a single wave is all you need to move a dancefloor.
Follow Attack Magazine & Expand Your Studio Toolkit
Looking to take your production skills to the next level? Explore our exclusive store offerings designed to sharpen your workflow:
The Secrets Book Bundle: Get 2 best-selling music production books. Buy more, spend less.
The Producers’ Book Bundle: Comprehensive guides covering everything from initial recording to final master.
Max for Live: Texture & Chance Engine V2: Add simple, effective textures and controlled random fluctuations to your most vital parameters.