The intersection of nostalgic retro-aesthetics and forward-thinking acoustic simulation remains one of the most compelling frontiers in modern electronic music production. In the latest edition of Synth Secrets, sound designers and producers are treated to a deep dive into u-he’s long-awaited Zebra 3, currently circulating in a robust public beta. While earlier generations of Zebra secured a legendary reputation for depth, modular flexibility, and unmistakable sonic character, this newest iteration expands the synthesizer’s legacy with a suite of groundbreaking tools—chief among them being advanced Modal modules.
For contemporary producers seeking to inject organic warmth, tactile realism, and complex rhythmic textures into minimal tech, house, or techno, Zebra 3’s physical modelling architecture offers a transformative workflow. By routing basic noise generators through physically modelled resonant structures—such as the "Punched Can" or "Metal Bowl"—producers can effortlessly bypass traditional sample libraries and standard subtractive synthesis. The result is a hyper-realistic, highly dynamic percussive arpeggio that feels both intimately acoustic and sharply electronic. This article breaks down the historical context of tuned percussion, details an exhaustive, step-by-step masterclass on building a dancefloor-ready patch inside Zebra 3, and examines the broader implications of physical modelling for the future of virtual instrument design.
Detailed Chronology & Historical Context: The Evolution of Tuned Percussion
The 1980s Explosion of Tuned Percussion
To truly appreciate the engineering breakthrough behind Zebra 3’s Modal modules, one must look back at the sonic landscape of the 1980s. From the pristine pop productions of Madonna and Gloria Estefan to iconic cinematic soundscapes like Predator and Romancing the Stone, the decade was defined by a sudden, massive proliferation of marimba-esque, tuned percussive elements.
This shift was not merely stylistic; it was technological. Prior to the mid-1980s, analog subtractive synthesizers dominated the market. While beloved for their fat basslines and sweeping pads, traditional analog subtractive synths possess a fundamental limitation: they are remarkably poor at emulating real-world physical objects—especially hollow, resonant materials being struck with sticks or mallets.
FM Synthesis and Early Sampling
The mainstream adoption of Frequency Modulation (FM) synthesis and early digital sampling changed the paradigm overnight. When physical objects—such as metal tubes, hollowed-out blocks of wood, or glass bells—are struck, they produce vast cascades of cascading resonances encompassing both harmonic and inharmonic overtone structures.
FM synthesis offered a way to approximate these complex, metallic spectrums through algorithmic carrier-modulator relationships. Simultaneously, hardware samplers allowed producers to capture static, playable recordings of acoustic percussion. However, both methods had distinct drawbacks: FM programming could be notoriously complex and brittle, while fixed audio samples lacked the infinite, organic variations of live acoustic performances.
Enter Physical Modelling in Zebra 3
Fast-forward to the current beta release of u-he Zebra 3, and physical modelling has evolved from academic synthesis labs directly into the hands of electronic music producers. The new Modal modules do not merely replicate a sample or approximate an overtone ratio via mathematics; they actively compute realistic physical resonances driven dynamically by the input signal’s volume profile.
Step-by-Step Masterclass: Building a Physical Modelling Percussion Patch
Whether you are aiming for minimal tech minimalisms or rich, Afro-Latin and tropical rhythmic grooves, Zebra 3 allows you to transform static noise into a living, breathing polyrhythmic engine. Below is the comprehensive, step-by-step workflow to construct your own percussive arpeggio using the Zebra 3 public beta.
Step 1: Crafting the Transient Source
To begin, load up an instance of the Zebra 3 beta and initialize a fresh patch (INIT preset). Navigate to the central modulation and oscillator panel:
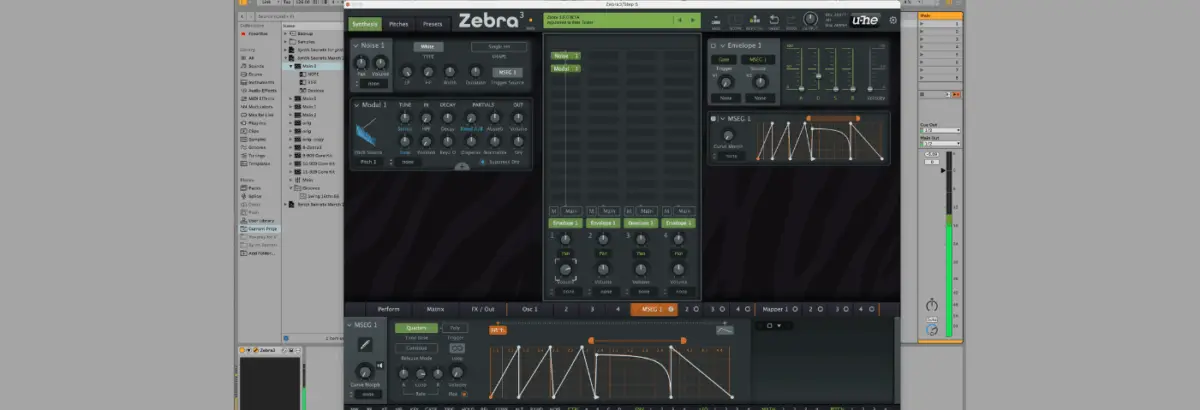
Oscillator Replacement: Remove the default oscillator and replace it with a Noise 1 module.
Envelope Shaping: Configure Envelope 1 by setting the Attack, Sustain, and Release parameters to 0, while extending the Decay time to approximately 400ms.
MIDI Programming: Draw in a single, one-bar-long MIDI note on C2 within your DAW’s piano roll and engage playback.
Noise Profile: Change the Noise Shape parameter to Single Hit. Listen closely to the resulting output; you will hear a sharp, tight volume envelope profile that mimics a wooden stick striking a hard, dense surface.
Step 2: Introducing the Modal Module
Next, we need to convert our raw noise burst into a resonant, pitch-aware percussive element:
Module Insertion: Add a Modal 1 module immediately following the noise source in your signal chain.
Resonance Calculation: This module calculates physical resonances dynamically based on the volume profile generated by the noise oscillator.
Suppress Dry: Click the Suppress Dry toggle to remove the dry white noise source from the output mix, leaving only the generated resonance.
Organic Variation: Play the sequence. Even without a formal physical model loaded yet, the output sounds remarkably like a tuned drum. More importantly, listen to the subtle micro-variations between consecutive hits—this inherent organic fluctuation is the hallmark of u-he’s Modal architecture.
Step 3: Applying the Physical Model
While the sound is tonally rich, it currently possesses the character of a synthetic electronic drum. To imbue it with true physical realism:
Accessing Models: Click the small + symbol near the Modal module to reveal the physical modelling slots, labeled A and B. Zebra 3 allows you to load models into both slots and seamlessly crossfade or modulate between them.
Selecting the Model: Load the "Punched Can" preset into slot A.
Sonic Transformation: Instantly, the synthetic resonance gains the unmistakable timbral characteristics, metallic rigidity, and airiness of a real hollow metallic container being struck.
Step 4: Balancing Noise Envelope and Model Interaction
To fully understand how the source sound interacts with the physical model, temporarily switch the Noise Shape back to Constant:
Observation: Notice how the percussive attack blurs and the crisp transient definition diminishes. While the overall harmonics remain tied to the Modal module, the percussive envelope relies entirely on the dynamic shape of the source sound.
Refinement: Switch the Noise Shape back to Single Hit to restore the tight percussive punch. If extended decay is required later in the arrangement, you can easily open up the sustain and release stages.
Step 5: Sequencing Rhythmic Grooves via MSEG
Zebra 3’s Multi-Step Envelope Generator (MSEG) unlocks complex, evolving rhythmic patterns without relying solely on external MIDI automation:
Timing Reference: Load reference audio files such as a standard 909 kick and closed hat into your project workspace, and set your project tempo to 126 BPM.
Trigger Configuration: Open the MSEG window and link the Trigger Source for both the Noise oscillator and Envelope from standard Gate to MSEG.
Drawing Patterns: Draw in a skippy, rolling rhythmic pattern, incorporating a looping section at the end of the bar to build dynamic energy.
Evaluating Release Settings:
A Release time of 0 introduces a subtle click at the tail end of the pattern (Audio File 5a). When played solo, this click may sound harsh; however, when paired with a heavy 4/4 kick drum (Audio File 5c), the click integrates into the percussive groove as a transient layer.
For sections where the arpeggio plays isolated from the drums, extend the release time (e.g., 323ms, Audio File 5b) to smooth out the decay.
Step 6: Melodic Rifting with the Mapper Module
To elevate our static percussive pattern into a driving melodic hook:
Channel Duplication: Before making structural changes, duplicate your current channel track in your DAW as a backup.
Assigning the Mapper: On your original channel, CTRL-click or right-click the Modal 1 Tuning parameter and assign it to Mapper 1.
Modulation Depth: Navigate to the Mapper settings within the Modal module and set the tune modulation depth to 16.
Melodic Programming: Program your own custom pitch offsets or load the provided module preset to transform the rhythmic noise into a catchy, rolling musical riff (Audio File 6).
Step 7: Layering for Power with "Metal Bowl"
To give the patch professional-grade weight and width:
Third Channel Copy: Duplicate the channel once more so you have three distinct layers running simultaneously.
Model Selection: On this third layer, switch the physical model preset to Metal Bowl.
Parameter Tweaks: Disable Suppress Dry, set the Tune parameter to +12, and right-click to extend the tuning range to -24. Set Position to 100, Decay to 19, and pull Dispersal down to 0.
Stereo Width: Apply a Stereo Tune value of 32 cents to widen the sound across the stereo field, resulting in a aggressive, clackety, and powerfully driving sonic layer (Audio File 7).
Step 8: Complex MIDI Arrangements and Final Jamming
To maximize the creative potential of your layered Zebra 3 patch:
Complex MIDI Data: Load a varied MIDI file (such as Busy.mid) across all three channels. These patterns utilize overlapping notes and varied gate lengths to trigger the patch’s internal loop points dynamically.
Spatial Distribution: Pan the individual layers across the stereo field, and experiment with independent Sustain and Release settings.
Final Master Output: Combining these layers yields an intricate, evolving, and punchy percussive workout born entirely from simple bursts of white noise (Audio File 8).
Supporting Context & Metrics
The release of Zebra 3 in public beta represents a major milestone for u-he, a company renowned for uncompromising sound quality and deep digital architectures. Industry metrics across leading producer forums (such as KVR Audio) indicate record-breaking download numbers for the beta installer and license cards.
Production Element
Traditional Approach (Subtractive/Sampling)
Zebra 3 Physical Modelling Approach
Source Material
Multi-gigabyte sample libraries or static audio loops
Limitless modulation via MSEG, Mappers, and physical parameters
Official Statements & Industry Reception
Sound design pioneers and beta testers have widely praised u-he’s implementation of physical modelling within a modular framework. Industry commentators note that while software synths have increasingly leaned into analog emulations, Zebra 3 carves out a distinct niche by mastering acoustic resonance simulation.
"When a synth nails that balance of nostalgia and forward-thinking design, it’s hard to resist. The Modal modules don’t just imitate reality; they give you complete structural control over how physical objects vibrate, react, and decay in a modern electronic mix."
— Synth Secrets Review Team
Early community feedback highlights the seamless integration of modulation sources—such as the MSEG and Mapper modules—with the physical modelling engine, allowing producers to achieve complex polyrhythms and evolving timbres that would require extensive plugin chaining in traditional digital audio workstations.
Future Outlook: The Next Era of Software Synthesis
As the audio software industry looks toward the future, tools like u-he Zebra 3 signal a paradigm shift away from static sample playback toward dynamic, physically informed synthesis engines. Producers no longer need to rely on rigid acoustic recordings to achieve organic textures in electronic music genres like techno, minimal tech, and experimental electronica.
By marrying the legendary modular routing capabilities of the Zebra series with state-of-the-art physical modeling, u-he has provided a glimpse into the next generation of sound design. As the Zebra 3 public beta continues to mature ahead of its official commercial release, producers worldwide now possess an inexhaustible canvas where white noise can be sculpted into anything from a hollow wooden block to a crushing metallic percussion instrument—proving once again that the boundaries of software synthesis are limited only by imagination.
For those interested in testing these techniques firsthand, the Zebra 3 public beta installer and beta license cards are currently available via the KVR Audio Forums.